Contact Information in the Digital Age: Everything About vCards and Setting Them Up in WordPress
In our digitized world, the exchange of contact information has become easier and more efficient. The vCard represents a contemporary interpretation of the traditional business card in electronic format. In this article, we’ll explain what a vCard is, its benefits, and how to set up a vCard in WordPress.
What is a vCard?
A vCard is an electronic file that stores contact information in a standardized format. It is designed to store and exchange details such as name, address, phone number, email address, website, and other information about a person or business. Similar to a digital business card, vCards facilitate the seamless exchange of contact details among different electronic devices, applications, and platforms, making communication and networking easier. The vCard file uses the “.vcf” (vCard Format) file extension and can be imported and exported in various applications such as email clients, address books, calendars, and mobile devices.
Benefits of vCards
Now that we’re familiar with the concept of vCards, let’s delve into the six advantages of using vCards:
1. Simple Exchange of Contact Information: vCards enable easy exchange of contact details by allowing information to be quickly and effortlessly shared between different devices, applications, and platforms. This facilitates the sharing of information during business meetings, conferences, or other social interactions.
2. Standardized Format: vCards use a standardized format that is supported by most modern email clients, address books, and contact management applications. This ensures that data is consistently and accurately displayed and stored.
3. Comprehensive Information: In addition to basic contact details such as name and email address, vCards can also include additional information such as job title, company location, and more. This allows for a more comprehensive representation of yourself or your business.
4. Time Savings with vCards: Using vCards saves time for both your customers and yourself. A link and QR code are automatically generated for each new contact created. This allows your customers to conveniently save or share the information on their devices without manually entering or transferring contact data. This means that contact data no longer has to be entered or transferred manually.
5. Cross-Platform Compatibility: vCards are largely cross-platform compatible, meaning they can be used on both computers and mobile devices, regardless of the operating system or application software.
6. Environmentally Friendly: Using vCards reduces the need for printed business cards or physical contact data, contributing to reduced paper consumption and environmental friendliness.
Setting Up vCards in WordPress with Easy vCard
Below, we’ll guide you through the setup of vCards using our Easy vCard Plugin for WordPress. The setup process consists of four steps, which we’ll explain step by step. So you can easily and quickly integrate Easy vCard into your WordPress website.
Step 1: Purchase and Install Easy vCard
In the first step, you should purchase our “Easy vCard” plugin to use it on your WordPress website. You can do this directly through our website. Send us an email to inquire about Easy vCard. After completing the purchase, you’ll receive a license key via email, which you can use to activate the plugin on your website.
After the purchase, you can install and activate Easy vCard. Log in to the backend of your website and navigate to your WordPress dashboard. Click on “Plugins” in the left menu bar. Then select the “Upload Plugin” option and upload Easy vCard. Once the plugin has been successfully uploaded, you can install and activate it. For the final activation of Easy vCard, you’ll need the license key. Enter the license key and begin configuring the basic settings.
Step 2: Configure the Basic Settings
After installing Easy vCard, you can make adjustments to the plugin’s default settings. To do this, go to your WordPress dashboard and click on “Easy vCard,” then select “Settings.” As the first setting under “domain,” enter your website domain. The checkbox next to the “domainLinkEnabled” field determines whether the link should be enabled or not. After making your changes, you can save them using the “Save” button.
Step 3: Add Locations
To be able to add a location (office or company location) to your vCards later on, you need to set up these locations in the next step. If you don’t want to add a location to your vCards, you can skip this step and proceed directly to step 4.
You can access the location settings via the WordPress dashboard under “Easy vCards” and then “Locations.” By clicking on the “Add new Location” button, you can enter a new location. The fields that can be filled with data include:
- Location Name
- Street
- Street no.
- City
- Postal Code
Once you’ve clicked on the “Add new Location” button, a new row will be added. Here, you can enter your data. Click on the “Plus” sign next to each field and enter your information. You can confirm your entries using the checkbox or revert your input using the “X” button.
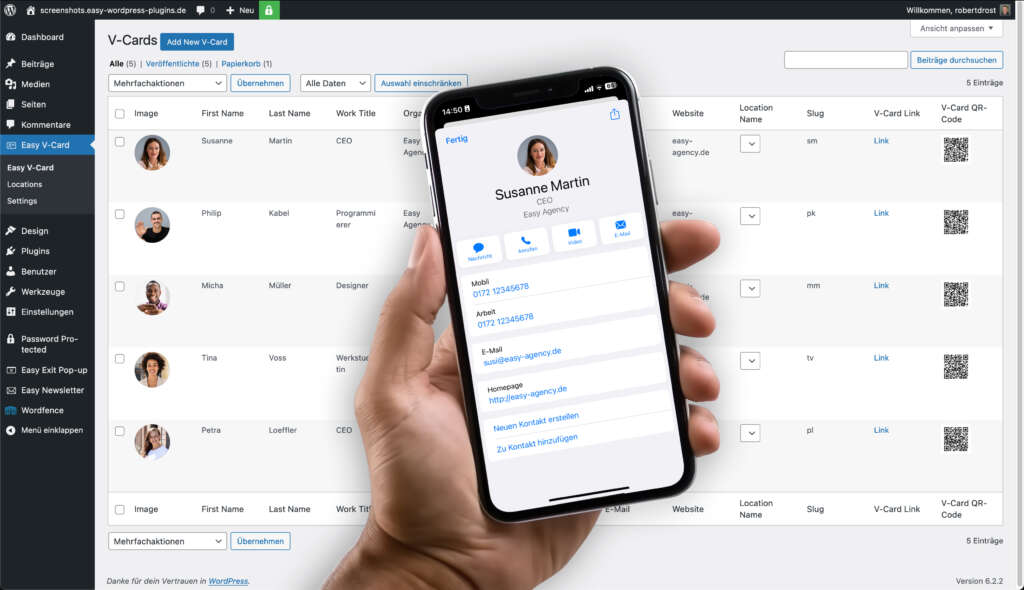
Step 4: Create Your First vCard
After configuring the basic settings and adding locations, you can create your first vCard. To do this, navigate to the WordPress dashboard and click on “Easy vCard.” Use the “Add New V-Card” button to add a new row, which you can now fill with your data. The fields you can fill in include:
- Image
- First Name
- Last Name
- Work Title
- Organization
- Phone Mobile
- Phone Work
- Website
- Location Name
- Slug
With Easy vCard, you have the option to add an image to your contact details. Click on the edit pencil and then add an image from your media library or upload a new file. Filling in the fields from “First Name” to “Website” follows the same principle. Just click on the “Plus” sign in the respective field. A small window will open, allowing you to enter your information. Afterward, you can confirm your data using the checkbox or revise your settings using the “X” button.
You can select the “Location Name” from the dropdown list of your predefined locations. Finally, you can optimize the slug. When creating a new vCard, a slug is automatically generated for each person. You can customize it to make it more meaningful; for example, you could use the person’s initials. Keep in mind that the slugs should not duplicate for your created vCards to ensure that the generated links and QR codes work properly.
Conclusion
In summary, vCards offer a contemporary solution for exchanging contact information in our digital world. Their versatility, standardized format, and easy setup make them an efficient tool for building connections and facilitating communication. The Easy vCard Plugin enables you to seamlessly integrate vCards into your WordPress website. By foregoing printed business cards and opting for vCards, you contribute not only to environmental friendliness but also to smooth interactions in the digital realm. Use vCards to maintain contacts and expand your network.