


19 July 2023
How to set up a newsletter in WordPress – Easy Newsletter
A newsletter is an effective and straightforward way to keep your readers regularly updated and in touch with them. If you run a WordPress website, you can set up a newsletter in just a few steps and inform your readers about news, offers or blog updates. In this post, we'll show you step-by-step how to set up a newsletter with our user-friendly „Easy Newsletter” plugin in WordPress.
Step 1: Install Easy Newsletter
The first step is to install and activate the „Easy Newsletter Plugin“. To do this, log into the backend of your WordPress website, navigate to your WordPress dashboard, and click on „Plugins“ in the left-hand menu. Then, select the „Upload Plugin“ option and upload the Easy Newsletter Plugin. Once the process is complete, you can install and activate it. Please note that you will need a license key to activate Easy Newsletters. You will have received this via email after purchasing Easy Newsletter. Enter the license key and you can start using Easy Newsletter.
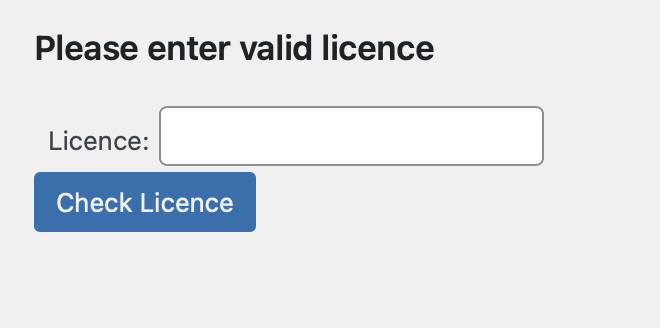
Haven't bought Easy Newsletter yet? You can find out more and purchase a licence here:
Step 2: Configure the basics
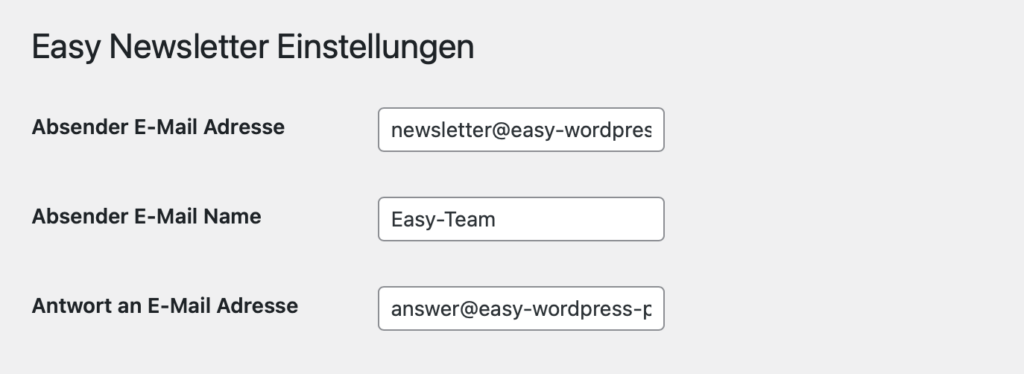
After installing Easy Newsletter, you can now make adjustments to the default settings. To do this, go to “Easy Newsletter” in your WordPress dashboard. Click on “Settings” to adjust the settings. You should edit the following fields:
- Sender email address
- Sender's email name
- Reply to e-mail address
The “Sender email address” is the email address your newsletter is sent from, please enter your desired email address here. The ”Sender email name“ is the name that will be displayed to your subscribers when they receive your newsletter. In the “Reply-to email address” field, you can set the email address to which replies to your newsletter should be sent.
Additionally, you can change a lot of more specific options, such as how many emails are sent per interval, what subscriber categories exist, and which subscriber list you want to use. Explanations for all settings can be found in the documentation.
Easy Newsletter is also compatible with most SMTP plugins, allowing you to send your emails from your own inbox instead of via your WordPress server. Sending via your own inbox increases the likelihood that your newsletter will actually reach your subscribers and won't be blocked.
Step 3: Create a registration form
For readers to sign up for your newsletter, you'll need a sign-up form. Our Easy Newsletter Plugin already has a pre-made form that you can customise and place on your website.
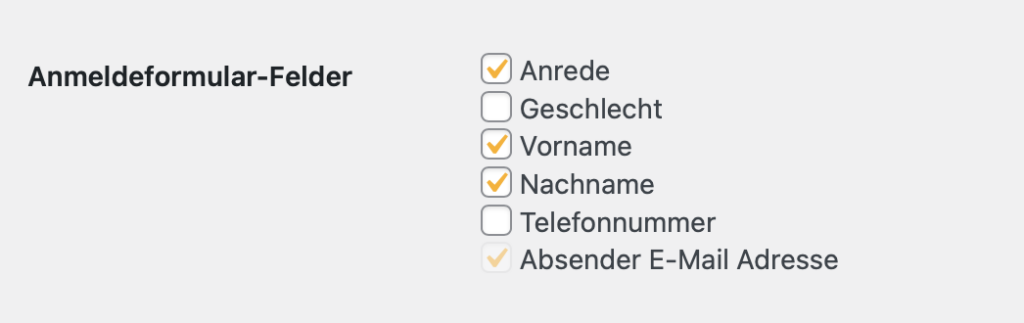
On the “Settings” page, you can determine which fields are requested when new readers sign up for your newsletter. The default fields are salutation, first name, last name, and email address. You can select or deselect additional form fields using the checkboxes. This way, you can activate spam protection for the signup form as well as add a double opt-in.
You can find further information on the sign-up form for the newsletter on the pages in the WordPress dashboard. Easy Newsletter has added seven pages there that are required for the plugin and must not be deleted. These are:
- Newsletter confirmation denied page
- Easy Newsletter Confirmation Success Page
- Easy Newsletter Registration Form Page
- Easy Newsletter Registration Success Page
- Easy Newsletter Unsubscribed Confirmed Page
- Easy Newsletter Unsubscribe Page
- Easy Newsletter Form
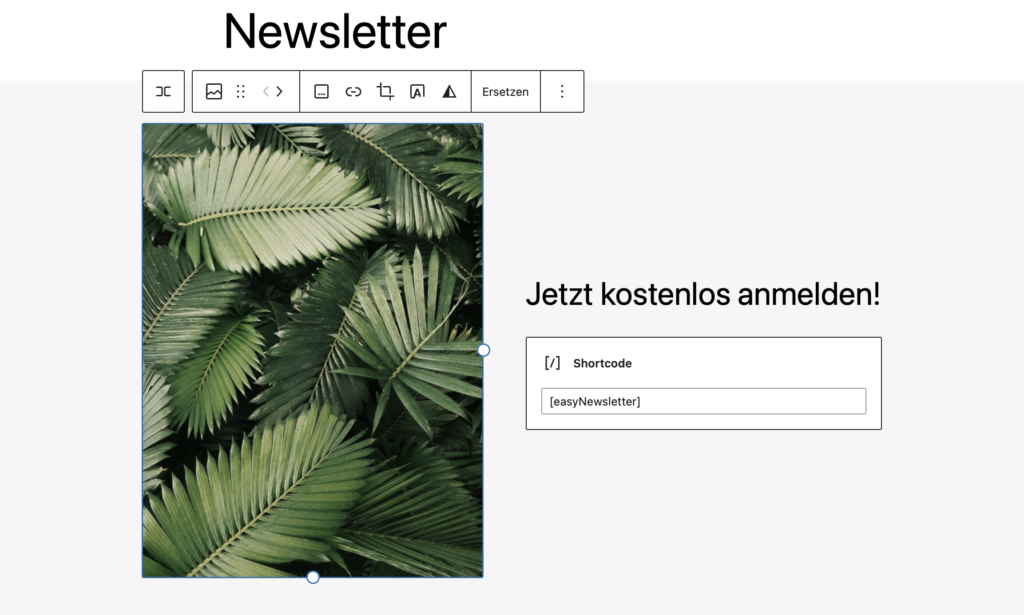
You'll find the registration form on the “Easy Newsletter Form” page. If you click on the page in edit mode, you'll see the shortcode [easyNewsletter] there, which you can also use on other pages.
You can make extensions to your registration form on the “Easy Newsletter Registration Form Page”. Here, for example, you can add a heading to your registration form, add an image, or add a background colour. You can easily implement all of this using the standard WordPress blocks. You can additionally adjust the appearance of your registration form using CSS, but this is not necessary.
Step 4: Edit the standard emails
After adapting your sign-up form, you should also make adjustments to the standard emails from Easy Newsletter. These emails are sent as soon as readers sign up for or unsubscribe from your newsletter. Upon signing up, they receive a welcome and confirmation email, and in the event of unsubscribing from the newsletter, a cancellation email. You can find the three standard emails from Easy Newsletter in the WordPress dashboard under Easy Newsletter „All Newsletters“. The emails are named as follows:
- Default – Welcome
- Default – Unsubscribed
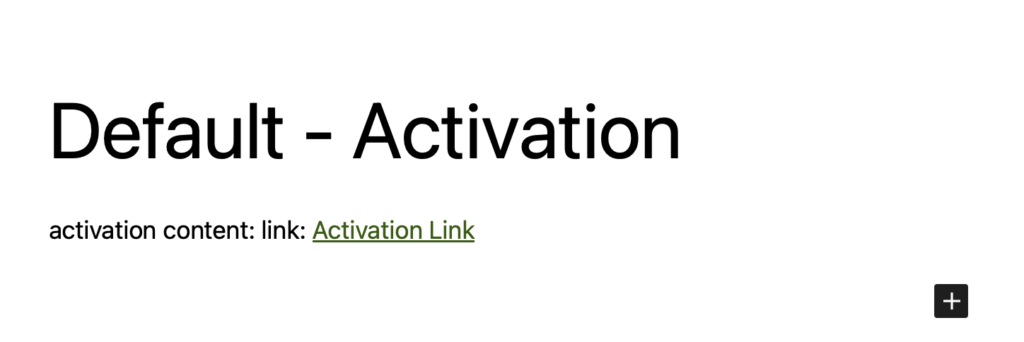
- Default – Activation
To edit the default emails, you can simply open them and adapt them using your editor. This way, you can add your desired text and other content such as your logo or images to each of the three emails. You can easily use the standard WordPress blocks for this. Please ensure that you do not delete the existing links in the default emails.
Welcome your new subscribers in the welcome email, ask them to confirm their newsletter subscription in the activation email, and assure them of their unsubscribe from the newsletter in the unsubscribe email. If you are happy with the changes to the emails, save them using the „Update“ button. You can also send a test email using the „Send Test Mail“ button. You can set the email address for the test email in the right-hand sidebar under “Newsletter Settings”.
Step 5: Manage your subscribers and import existing contacts
Once your sign-up form is available on your website, readers can sign up for your newsletter, and you will receive a list of subscribers. You can view your subscriber list in the dashboard under “All Subscribers.” Here, you also have the option to create new subscribers via the “Create” button.
If you already have subscribers for your newsletter and want to import them into Easy Newsletter, you can do so easily. To do this, go to Easy Newsletter in your WordPress dashboard and then to the “Settings” menu item. Scroll to the very bottom of the Settings page. There you can import your existing contacts as a CSV file. For the import of your contacts to work, your CSV file needs to have the following columns. It is important that the columns are set up in the following order:
- Column 1: Salutation
- Column 2: Gender
- Column 3: First Name
- Column 4: Last Name
- Column 5: Phone Number
- Column 6: Email Address
- Column 7 and subsequent columns: Optional individual fields
If you have requested further data from your subscribers, you can create this in subsequent columns (after the email address). If you have not previously requested any specific data from your readers, such as a telephone number, that is not a problem. Simply leave these fields blank. You can use services such as Google Sheets or Excel to create a CSV file.

After you have stored your subscriber data in a CSV file, you can export it and upload it to your WordPress website via the “Choose File” button and then “Import CSV”. After importing your subscribers, they will be displayed under the “All Subscribers” menu item.

Step 6: Create your first newsletter
Now that you've successfully created your subscribers, it's time to create your first newsletter with Easy Newsletter. To do this, click on “All Newsletter” in the WordPress dashboard and then click the “Create” button. You are now in your usual editor with WordPress's own blocks. Here you can enter the title of your newsletter and add content. Simply use the familiar WordPress blocks and insert your text, images, and other desired content.
If you have content that you repeat in every newsletter, such as a footer for your newsletter, you can also create reusable blocks and include them.
As well as the design and content settings, in the right-hand sidebar under “Newsletter Settings” you can set your subject line, a newsletter excerpt and a test email address for your newsletter.
If you want to make even more complex settings for your newsletter, you can read our Easy Newsletter documentation. There we describe all the possibilities the plugin offers you.

Step 7: Review and Control
Once you have finished creating your content, you can save the newsletter as a “Draft” and view a preview of your newsletter under “Preview”. In this step, you can also send a test email. To do this, simply use the “Send Test Mail” button and the newsletter will be sent to the test email address you have set up in the right-hand sidebar under “Newsletter Settings”.
If you're happy with how your newsletter looks, but don't want to send it out just yet, you can save it using the “Publish” button.
As a general rule, most newsletters require custom CSS settings to make them look visually appealing on all devices and in all email clients. To add your custom CSS code, click on “Easy Newsletter” in the WordPress Dashboard and then on the “Settings” menu item. Here you will find the “Custom Newsletter CSS” field, where you can enter your CSS code. The CSS code you insert here will then automatically apply to all your newsletters.

After you have made the CSS settings, it is advisable to perform a final check of your newsletter. Check your content for spelling mistakes and other inconsistencies, and send the newsletter again to your test email address.
Note: Specific settings for the recipient group, mail attachments, and sending rules can be set at the bottom of the page. You can find explanations for these in our documentation.
Step 8: Send the newsletter
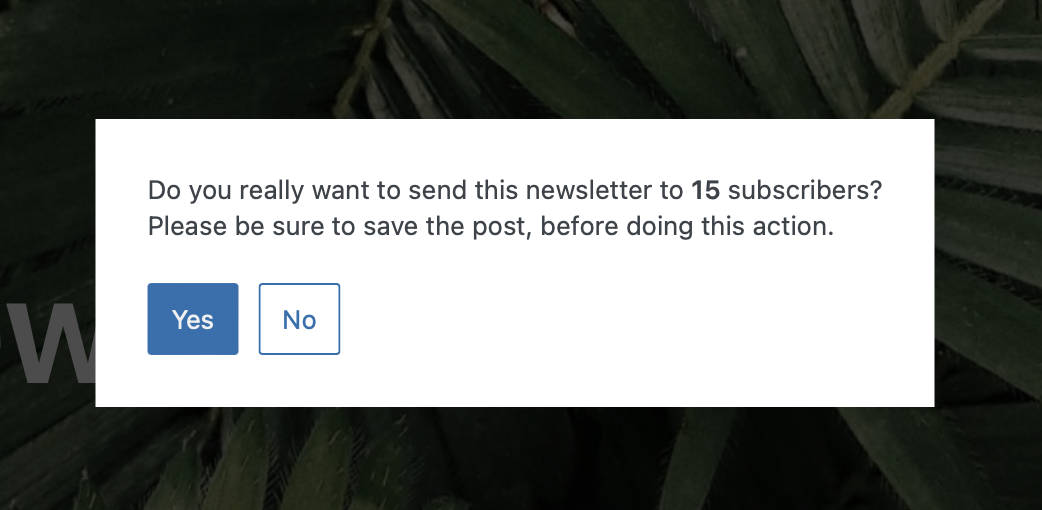
Once you've double-checked your newsletter and are happy with the result, you can send it to your subscribers. To do this, simply click the „Send Newsletter“ button in the newsletter. A pop-up will appear showing you how many recipients your newsletter will be sent to. If you're sure everything is correct, confirm the sending by clicking “Yes”. If anything is still not quite right, you can cancel the sending by clicking “No”.
Conclusion
Setting up a newsletter with WordPress is straightforward with our Easy Newsletter and a simple step-by-step guide. Use the steps above as a guide to create a newsletter that will engage and inform your readers. If you have any questions, please feel free to contact our support team and we'll help you get set up.

About us
We are a digital agency in Hamburg for WordPress websites, online shops, and digitisation. With our Easy Plugins, we help you improve your WordPress website.

Easy Newsletter
Create and send your newsletter directly via your WordPress website without relying on an external email marketing tool and with no ongoing costs. Try Easy Newsletter now for 30 days free of charge and benefit from a wide range of features for your email marketing.